
 by
by Vesta Control Panel This is an excellent panel to manage your VPS , which can even be considered as an alternative to Cpanel that most servers use. Personally I have used both, but if the first one caught my attention because of all the configurations that can be done even in a 5 USD VPS it can withstand a high traffic spike without the need to switch to a dedicated one.
What you need to know before installing Vesta Control Panel
It must be a clean installation, that is, it does not have apache, php previously installed, if these components already exist, it will not work. Suppose they have already arrived in the VPS, what you need to do is remove them.
This admin panel is compatible with the following Linux systems: RHEL / CentOS 5,6,7 / Debian 6,7,8 / Ubuntu 12.04-16.10
Installing the Vesta Control Panel
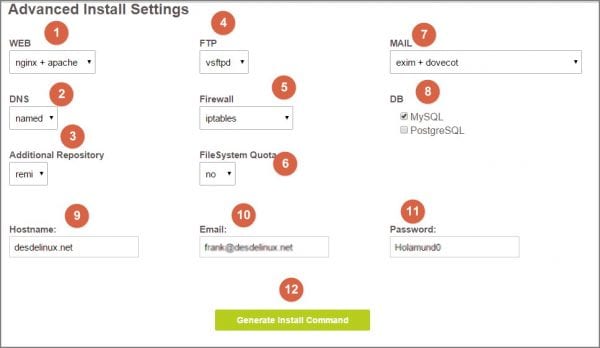
The installation process is super easy, just go to this link and after that we have to select the components we want to include, for example nginx together with apache (for me the most recommended), in this case nginx will be in charge of serving all the static content, like images and css.
It is also possible to use nginx, but you may have problems with friendly URLs if you are not an advanced user, you can select the first one.
In DNS you can leave by default the one that is named, it is very easy to configure it later. Likewise you can leave FTP by default, in the firewall you can select only Iptables, if you choose that Iptables plus fail2ban will give you more security, but this configuration will consume a lot of RAM memory, in fact I could see more than 500 MB.
Regarding File System Quota it is left by default NO, in MAIL you can leave exit plus dovecot, in the database logically it should be left MYSQL In the additional repository you can exit REMI (default option). Finally, in Hostname I will write the url of your domain, and the email and a password (these will be to access the panel once it is installed). Click on generate the installation command.
By doing so, it will generate a command line, which will help us install our vesta panel almost automatically on the VPS server or dedicated server.
Installing Vesta Control Panel via SSH
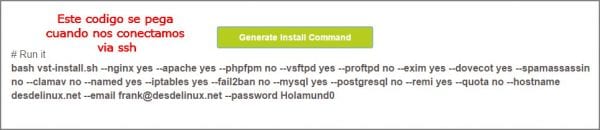
After the above, we need to contact via ssh, login as root and paste the generated command line.
But before that you need to be able to download the script, for that you need to write in the console:
curl -O http://vestacp.com/pub/vst-install.sh
Or the command to install packages depending on your Linux distribution, now we will be ready to paste the lines of code generated in the previous part.
If it gives us an error, at the beginning of the installation, we can solve it in a very simple way, before pasting the commands you must write the following -Force you will be able to see that the installation process starts without any problem.
This process normally takes between 10 and 15 minutes, everything will depend on the number of components that we have selected, out of curiosity I have practically done all the combinations of components (I had planned to move my blog to the VPS) in order to see which one gave me the best results, I could see that when we chose exim + pigeonnier + spamassassin + clamav if it usually takes a long time.
When you have completed all this process, it will tell us that everything is correct and we can enter from our IP address: 8083 . The access data is what we put when selecting the components.
And so that it is not so long, in another article you can publish how to configure DNS, how to install wordpress. You may feel that it is complicated, but it is not, so you get used to it and realize that it is as simple as checking your Twitter.